| Audio Cross Fade - No keyframes |
|
The Secrets out of the Bag
To be completely honest with you this is a trick I've been doing for years and have hesitated about sharing it because frankly I think it is just too cool. That being said, I'm sure I'll get flamed royally as soon as I post with by a ton of folks saying, "you idiot, I've been doing that since Avid 1.0" or "yea, that's in So and So's book on 'How to not Suck as an Editor'". So here goes.
The common way of editing audio in most non linear editors is by creating key frames in the audio track. I think some systems refer to them as rubber bands, I have no idea why. Basically it is a very tedious task of creating little tiny points to set the volume at and then the system will ride the audio level as the playback head reaches the various audio settings. Others have gone into great detail showing how all this works and, not wanting to reinvent the wheel I'll let you read their tutorials. They are very complete and seem to be well made.
However, I can think of nothing LESS that I would want to do then be clicking a bunch of dots and imagining I'm riding audio levels. Let me show you an alternative that takes full advantage of a feature of Final Cut Pro that allows you to do Audio Cross fades between clips on the SAME track. There is also an added bonus we'll get to later.
The Problem
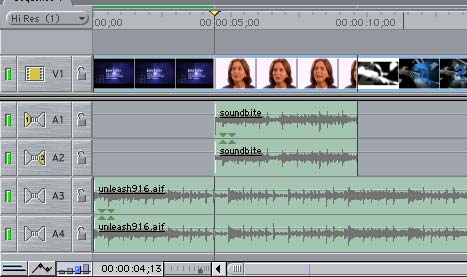
Figure 1
Take a look at this image (Figure 1), it's your basic music track on tracks 3 and 4 with dialog, a video shot married to tracks 1 and 2, at least that's the way I usually organize things. Now the problem is that the very cool sound track that my friend Jeff composed for me is gonna fight with the sound bite if it leave it up at full volume, duh, who doesn't get that. The conventional wisdom that most people follow is to click on the "Mount Everest Button" (Figure 2 "A"), who knows what Apple calls it and then get the Pen Tools from the Tool box and start making those crazy dots. Uh, I don't think so!
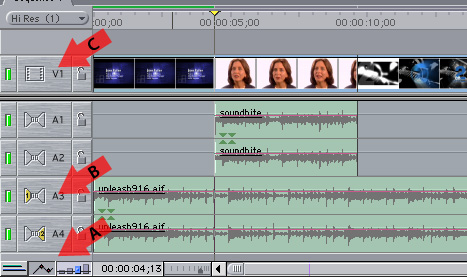
Figure 2
First you'll press on the "Mount Everest Button" (Figure 2 "A") in the lower left corner of the Timeline Window and then make tracks 3 and 4 yellow by clicking on the tiny speakers (Figure 2 "B"). This makes them the "Target Tracks". I think that is what they call it. While you're at it, turn of the yellow highlight on V1 (Figure 2 "C"). You don't really need to do this for what we are doing but it is good to work in a logical manner, plus, I find that NOT thinking about these Target Track indicators makes for a lot of mistakes when a Timeline gets more complicated.
Some Keyboard Shortcuts you'll need to know
| SHIFT E |
- Go to next Edit |
| OPTION E |
- Go to previous Edit |
| CTRL V |
- Slice Clip at Marker |
| R |
- Rolling Edit Tool |
| A |
- Normal Edit Tool |
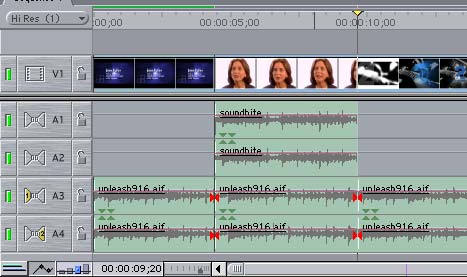
Figure 3
So using "SHIFT E" and "OPTION E" find the beginning of the sound bite clip and then press "CTRL V", this will slice all the active clips that are currently Targeted (A3 and A4) that cross that point in the timeline. Since there is already an image cut at this point in the timeline we didn't really need to Un-Target V1. Do the same thing at the end of the Sound bite. What you are doing here is making your sound file into three separate clips on the timeline (Figure 3), but that's ok, you'll never hear the transition, or at least you shouldn't.
Now we deal with the audio. Put your cursor right on top of the pink line of the middle clip. I have no idea what the name of the new cursor that pops up is but basically it's gonna let you grab that pink line and yank it down. Now if you play across this "sub clip" you'll hear that the music drops quite abruptly at the edit points. This is where we take advantage of the ability to do a cross fade between two clips on the same audio track.
Fine Tuning
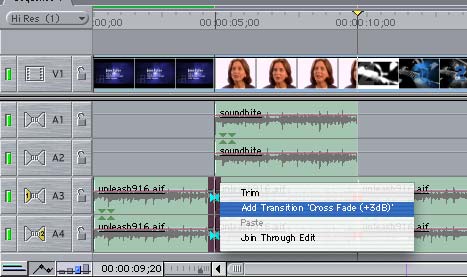
Figure 4
Put your cursor right over the transition where the audio makes a drastic change and either Right Click on your Two Button mouse or CTRL click (Figure 4). You'll notice that one of the selections is Add Transition... DO IT! What you have done is to cross fade between on the loud clip and the softer clip.
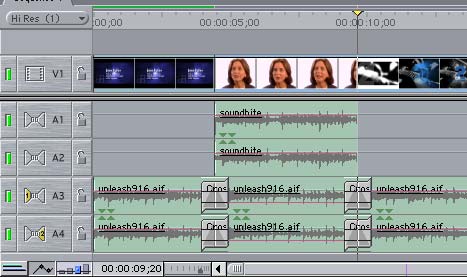
Figure 5
Advantages
There are a couple of really cool advantages to doing your cross fades this way (Figure 5). One, you can adjust the length of the cross fade just by pulling the end of the effect out or pushing it in shorter. Second, you move the whole cross fade forward or back in time by using the "Rolling Edit Tool" (try pressing the letter "R" on your keyboard). By using the Rolling Edit you can position the cross fade earlier or later in a split second. But there is one more VERY cool thing that I mentioned earlier.
Now that we have defined the music that coincides with the sound bite as essentially it's own clip we do a little audio trick that I learned YEARS ago in the old analog days but usually couldn't pull it off for logistic reasons. With out going into a ton of audio theory, try applying an EQ to the music and pulling a little bit of 2K - 4K out of it, basically what you are doing is digging a little hole that the voice from the sound bit can sit in. This will allow you to leave the low end of the music and the high 'twinkly' stuff but pull down all the frequencies that fight with the voice.
These kind of audio tricks are a tutorial in and of itself. For now I'll leave you with the hint and let you go and experiment on your own.
PAYBACK TIME. If you read this and found any part of it informative, Please eMail me below and let me know. If I find that people use this, maybe I'll write another.
© 2002 Chris Fenwick

|
|
