| Beginner - Useful to All |
30 Minutes
|
Did you REALLY think I was just going to give you a SAFE TITLE template. Now, if I were to do that what would you learn? Right. So what I'm going to do is to take you thru the steps of creating your own SAFE TITLE tempate.
Actually, I think that you will find that besides giving you a really useful tool when you are done this project will give you some basic competency in Photoshop that you will be able to apply to real projects. So, if you've never created something useful in Photoshop I would highly recommend that you do this tutorial. Besides, it's the only way to get a copy of my SAFE TITLE template.
| Techniques Use |
Keyboard Shortcuts Use |
- Select Colors
- Create Layers
- Scale Numerically
- Make Selections
- Stroke a Path
- Merge Layers
- Use Rulers |
| - OPT-DELETE |
Fill w/ Foreground Color |
| - D |
Retrieve Default Colors |
| - CMD-; (semi colon) |
Snap to Guides |
| - CMD-OPTION-SHIFT-E |
Copy Visible to Layer |
|
Welcome to Photoshop...
Before you start to create a Safe Title Template there are two things you need to know...
First, you'll need to know why you need it. More on that some other day.
Second, you need to know how large a video frame you are working in. If you dont' know this I suggest you read the "Getting Started" page.
Let's Go...
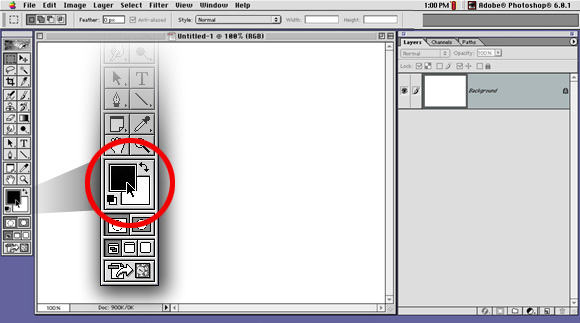
The first thing to know how to do is to select colors, it isn't that hard but this is an exercise in completeness. So click on the black square at the bottom of the Tool Palette.
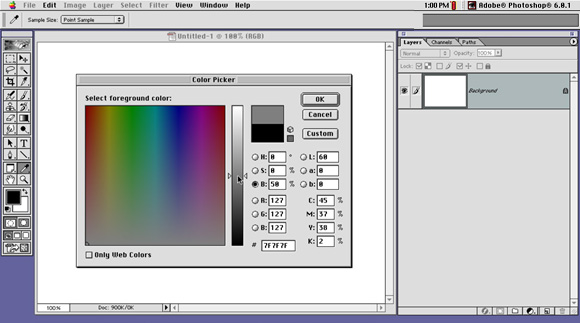
We're going to want to start by making the Background color gray, almost a useless step but makes it easier to see everything later. Click once on the COLOR SELECTOR and adjust the color to gray and click OK. OPT-DELETE is the shortcut for FILL.
Stack um Up Baby
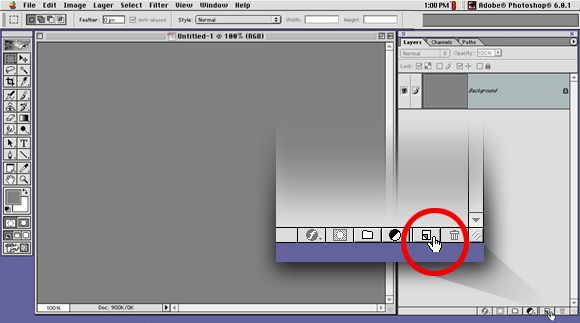
Now make a new Layer by clicking on the LAYER ICON at the bottom of the LAYERS tab. Fill (OPT-DELETE) this layer with Black ("D" to get Default colors back and OPT-DELETE for Fill). If you hold the OPTION key while you double click on this new layer you will be able to give it a name. Call it Black.
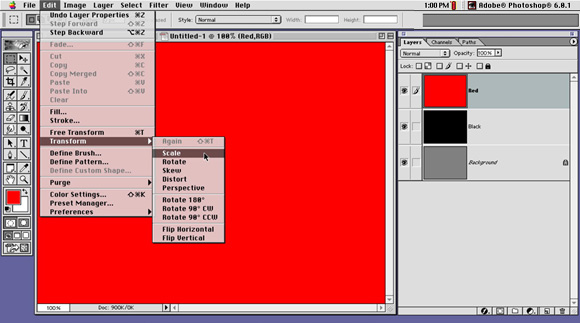
Repeat this process one more time and create a Red Layer.
Scale
The standard rule of thumb for SAFE AREA and SAFE TITLE is 90% and 80% of the screen. Select the top, Red Layer, that will represent the size of our SAFE TITLE, or 80% of the screen size. Once it's selected go to EDIT>TRANSFORM>SCALE. If you are using an older version of Photoshop be warned. Adobe has been playing Hide N Seek with this feature for a long time. Between Version 3, Version 4, and Version 5 the SCALE command had been in 3 different menus.
Once You have selected SCALE from the TRANSFORM menu Go to the Options Pallet and type 80 in the "W" box. By clicking on the chainlink icon to Lock the proportions the "H" box will change to 80% also.
Now repeat this process for the Black Layer but SCALE it to 90%.
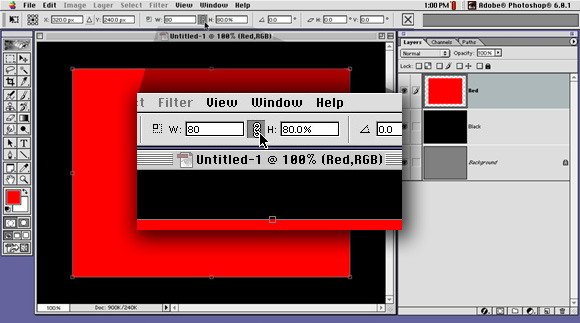
Notice in the expanded view below the small SCALING TOOL at the edge of the Red Layer. That means you are in the middle of the SCALE command. Many features of Photoshop are disabled until you hit ENTER on your keyboard and the SCALE settings take effect. Remember, on a Macintosh, in some applications RETURN and ENTER are not the same thing. This is an example of that. Hitting RETURN will not get you the results you want.
Selection
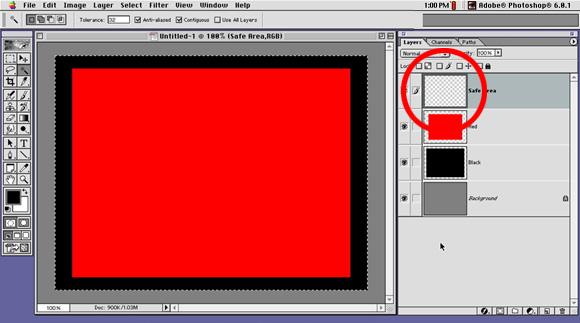
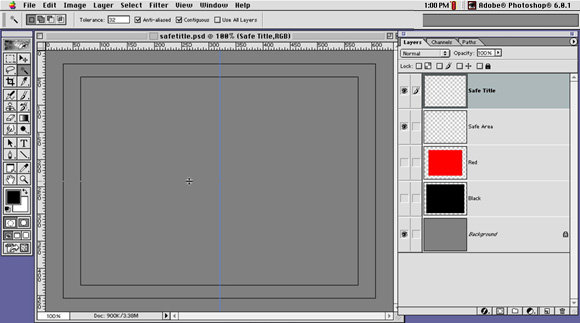
First make another new Layer and name it SAFE AREA. Select the Black Layer by clicking on it once in the Layers Tab. Now after selecting the MAGIC WAND tool by pressing "W" on your keyboard click once in the exposed Black border in the canvas. At this point you should see the MARCHING ANTS selection indicator.
Another way to make this same selection would be to COMMAND CLICK the Black Layer once. Either way works just fine, I'm just trying to show you options. Personally, CMD CLICK is less key strokes so I prefer it over the MAGIC WAND.

Stroke
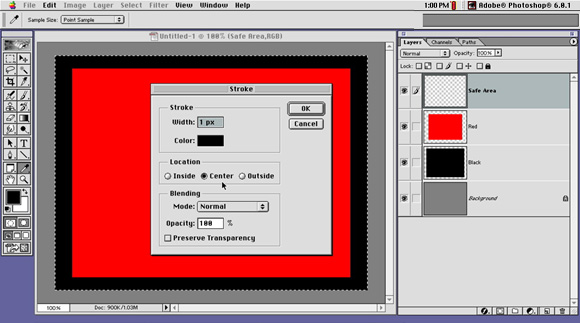
Now select the Safe Area Layer and go to EDIT>STROKE... STROKE is really cool. Here we are using it to draw a line along our selection path. However, this is a very simple selection path. You can use STROKE on anything that you have selected, squares, circles odd shapes, or even text.
| Macintosh Interface Design
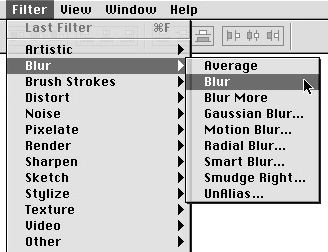
A quick word about the Macintosh Interface Design. Any time you see an elipsis (dot dot dot) after the command in a Menu you can be assured you are not actually making anything happen, you are not initiating anything. The dot dot dot means that you are calling up another window where you will be asked to make further settings.
For example take a look at the FILTER>BLUR sub menu. You can tell at a glance that FILTER>BLUR>BLUR will immediately initiate a command, while FILTERS>BLUR>GAUSIAN BLUR... will call up a window that will ask you more information. |
|
When the EDIT>STROKE... window comes up enter 1 for the pixel WIDTH and CENTER for location, CENTER means that Photoshop will trace the current selection and draw a line centered on the MARCHING ANTS. Although this 1 pixel line is not that critical this will be much more important in a moment.
Repeat this process of SELECTION, of the Red Layer, and STROKE on a NEW LAYER called SAFE TITLE and then turn off the VISIBILITY of the Red and the Black Layer.
Center Cross Hairs
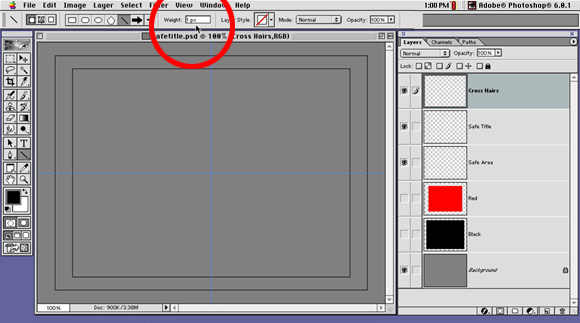
I've found that besides having a SAFE TITLE and SAFE AREA indicator it is nice to know where the center of an image is. To do this we'll put little cross hairs on our template. One day I will include in this file an indicator for a standard sized over the shoulder news box and maybe a template for a lower third banner for under a name key.
First, to find the exact center we'll turn on the RULERS by hitting CMD-R. Now by clicking on the RULERS and dragging out to the middle of the image you can watch the light blue GUIDE lines as it finds the center of the image. (Please tell me you can figure out half of 640 and 480 and 720 and 486 in your head, please!)
Once the light blue GUIDES are in place now we have to draw a couple of 1 pixel lines along the GUIDES. You can turn on SNAP TO GUIDES by hitting CMD-; (that's a semi colon), it should be a lot easier to draw right on the GUIDES that way. Use the LINE TOOL ( U ) and select a WEIGHT of 1 pixel in the Options Palette, now you can carefully trace along the GUIDES.
When you are done with the line tool you have to hit ENTER (not RETURN)
White Highlights
Our little project is starting to take shape, isn't it? The problem with this is that if we wer to leave our SAFE TITLE template with these thin Black lines then it would disappear anytime you put it over a dark image. What we want to do is to create a small White border around our Black templates.
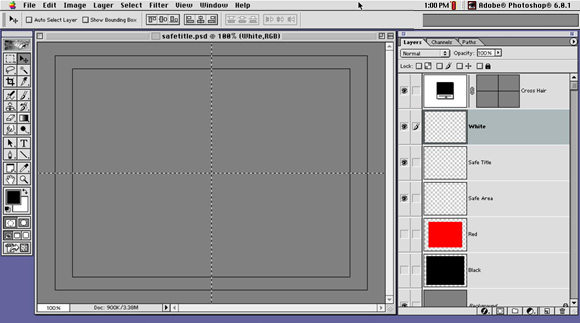
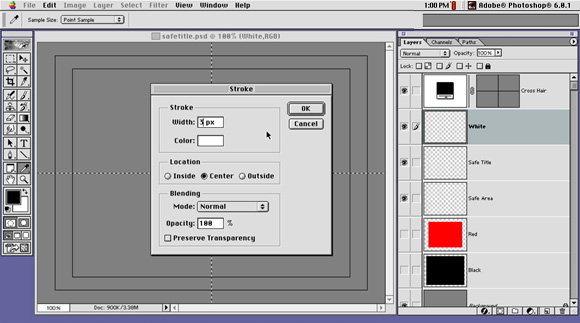
Make a NEW LAYER and put it under the Cross Hair Layer and call it "White". Select the active pixels in the Cross Hair Layer by CMD-Clicking either one of the Cross Hair Layer Icons. Now that you have a single line of pixels selected go to EDIT>STROKE... but this time select 3 pixels as the Width and keep the CENTER Radio Button selected and change the COLOR to White. Click OK to draw the wider White line under the thin Black line and hit CMD-H to hide the light blue Guide Line
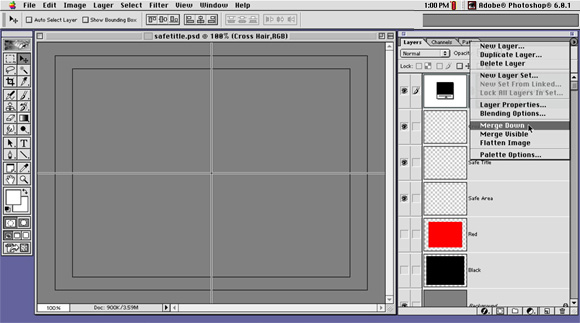
Merge Layers
This is starting to shape up isn't it? What we have now is the ability to see the SAFE TITLE indicators if they are over a dark image OR a white image. So let's MERGE the Cross Hair Layer and the White layer together. There are many ways to Merge Layers, Merge Down, Merge Visible, Merge Linked and Flatten. Each Method has it's benefits. Each of them with the excpetions of Flatten Image. There are many reasons why you should never Merge Image and to tell you the truth I can't think of a single reason why you would need to.
The main reason why you should never FLATTEN IMAGE is the same reason you don't want to paint the floor of a room and start at the door way, you'll end up painting yourself into a corner. Many people will FLATTEN IMAGE because they want to save a version of their compositions as a JPG or PCT or some other file format that does not support Layers. Here's a good trick. CMD-OPTION-S will allow you to Save As... which actually merges all the visible layers into a flattened image for you. By preserving your layer information and keeping it intact it allows you to always go back and make corrections, adjustments and fixes.
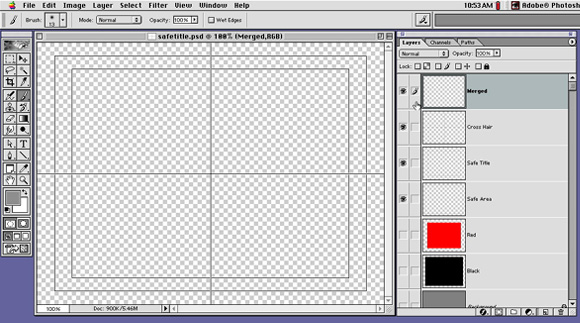
Notice that after doing a MERGE DOWN your resulting merged layer is called White. The reason for this is the Merge command takes the name for the new Layer from the Bottom Layer, don't ask me why, I guess it is a 50/50 choice for the programmer to pick one but, personally, I would have chosen the Top Layer as the dominate and therefore name of the new merged layer. Oh well.
I did this on purpose to show you that sometimes, if you are aren't careful you loose the name of your layers. Go ahead and Rename the layer Cross Hair, that is, if you are as anal retentive as I am.
Repeat the process of creating a layer under SAFE AREA and SAFE TITLE, CMD-Clicking the layer above the blank layer and Stroking with a 3 pixel White line and merging down.
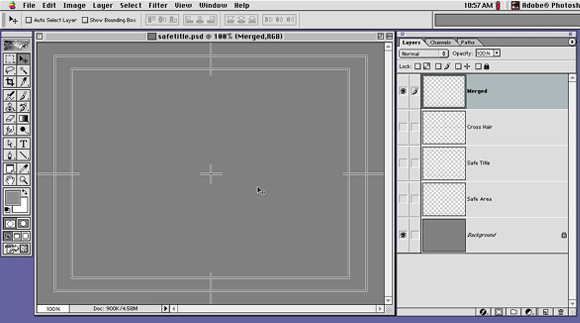
Bring it Together
For whatever reason in my personal SAFE TITLE template I have left three seperate layers called SAFE AREA, SAFE TITLE, and CROSS HAIR, maybe it is just rooted in my desire to always change things. In order to make this useful we need to make another Layer and Merge all the Visible layers into this new layer. Turn off the Background, Gray, Layer by clicking on it's Eye icon. Nowr for one of my favorite Photoshop short cuts, Select the new blank layer with only our three Hero Layers visible and press CMD-OPTION-SHIFT-E, this will copy all the visible layers into the currently selected layer and leave the other Layers intact. Merge Visible will almost do this BUT it destroys the original source layers.
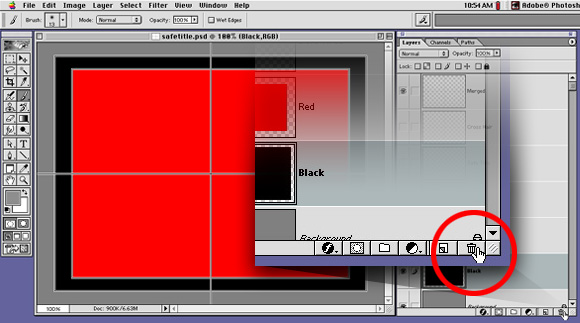
A Litte Clean Up
Even I can't think of a reason to save the Red and Black Layers so you can trash those now. There are actually 2 ways to trash a layer. First of all, and most commonly used is to grab and drag the layer down to the trash can icon at the bottom of the Layers Tab but you can also just highlight the layer you want to delete and then click once on the Trash Can, I think I found that one by accident.
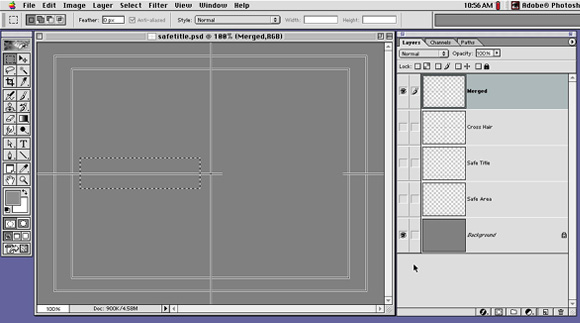
I've found that the cross Hairs don't need to be all the way across the image so I've gone ahead and selected portions of it in the big middle and just hit the DELETE key to open up the space some.
The last thing to do is to save the file as a Photoshop Document. This will perserve the complete Layer information.
This is what I do. I keep a copy of the SAFE TITLE on each of my computers and actually I've probably backed it up a few times too. When I begin a new project I start a new file, then open the SAFE TITLE file arrange my windows so that I can see the New Project and the SAFE TITLE file. Then drag the MERGED Layer into the new file WHILE HOLDING THE SHIFT KEY. This is awesome, when ever you drag layers between one document and another holding the shift key down will center the layer you are moving in the canvas of your destination document.
Conclusion
Congratulations, if you've gotten this far, you now have your own personally copy of my SAFE TITLE generator. I know this is long but frankly as I began writing this I realized that it was an AWESOME collection of commonly used techniques that everyone should know how to do.
PAYBACK TIME. If you read this and found any part of it informative, Please eMail me below and let me know. If I find that people use this, maybe I'll write another.
© 2001 Chris Fenwick

|
|
